Zero to Hero: Anytone AT-878UVII
The radio I used for this was the Anytone AT-878UVII, but the 868UV and the UVII-Plus version should be the same. A lot of this applies to DMR radios in general. Their operation confuses people who may be more familiar with “select a frequency, get contact” methods.
There are several parts that you must set up correctly for everything to work the way you want it to.
You may have heard the term CPS, “Code Plug Software.” Before discussing CPS, read what a code plug is.
Hold your Horses (USB)
DO NOT PLUG THE USB CABLE INTO YOUR COMPUTER YET. You won’t thank me now, but you would undoubtedly cuss me later if I did not warn you.
Start from Zero
I have detailed these instructions starting from a factory-clean reset. You can easily be confused by partially setting items and setting others incorrectly. If you are new at this, do yourself a favor and do a factory reinitialization.
Turn the radio off, hold down the PTT and P1 (just under the PTT) buttons, and turn the radio on. Do not release the buttons until you see:
“Are you sure you want to initialize radio?”
Press the green button to confirm.
Allow the radio to reset itself and “Confirm” the date without setting it. Do yourself a second favor by not doing additional customization until later, so you do not feel bad about wiping it out with another reset if you mess things up.
Before anyone rushes to argue about wiping their radio, if you’re already “moved in” with local channels, follow the instructions through the next three steps to “Import Intial Code Plug.” Save that as your backup, and then come back here and “Start from Zero.” Once you know what you are doing, you can re-load your backup and try adding your Hotspot setup.
Install USB Driver
This step is where people who did not heed my advice will have gone wrong. Some computers already have the proper drivers for the USB cable. It will not hurt to follow these instructions either way.
Many USB cables made to interface with devices have a small chip inside the USB plug, called an FTDI interface. FTDI is a product of Future Technology Devices International and many suppliers use these chips in their cables.
Virtual COM port (VCP) drivers cause the radio attached to the USB cable (via the FTDI chip) to appear as an additional COM port available to the computer. The CPS can access the radio in the same way as it would access a standard COM port. Go to the FTDI site and download the Virtual COM Port drivers. Open the archive in Windows and execute the CDM212364_Setup.exe installer within. Complete the installation and return here.
Install the CPS
Turn on your radio and go to Menu -> Settings -> Device Info. Scroll down to see your firmware version.
Download the Code Plug Software from Bridgecom’s wesbite. At the time of this writing, the most recent is “AnyTone AT-D878UVII PLUS - CPS V3.02 & Firmware V3.02,” but you should download the version corresponding to the firmware on your radio. Right-click the archive and select “Extract all.” Open the new folder, which is likely similar to D878UVII PLUS Vn.nn official release nnnn.
Open the folder with “CPS” in the name, such as D878UVII Vn.nn CPS nnnnnn. Execute the installer within, complete the installation, and return here.
Import Intial Code Plug
Plug your cable into your radio, and plug the USB into the computer. Turn the radio on and allow it to finish booting. Run the CPS, which is likely available as an icon on your desktop named “D878UVII_n.nn.”
Menu -> Set -> Set COM: There should only be a single COM port listed. If there is more than one, unplug all peripherals from your computer except for the Radio connected to the USB cable.
Program -> Read From Radio
When the CPS finishes reading, File -> Save and navigate somewhere you can remember. Save the initial CPS as something descriptive like
D878UVII_Stock.
We’ll now proceed with the creation of your new code plug.
Create New Code Plug
We’ll follow these steps in order:
Create Radio ID
Import Talkgroups
Create Channels
Create Zones
The order here is important. If you know enough to argue with that, you know enough to skip my instructions.
Radio ID
First, you must add your radio ID so the network will know who you are. In the tree on the left, expand Digital and then select Radio ID List. You can have multiple IDs here, but we will use just one. Double-click on the 1 in the “No.” column.

Change the Radio ID to the ID you were given previously on RadioID.net and that which you entered on your WPSD configuration page. Change the Radio ID Name to your callsign.
Create Talk Groups
Rather than creating Talk Groups from scratch, we will import them. The defacto DMR network for PTT talkgroup activation is BrandMeister, and the easiest way to get them all is to download them already in the Anytone format from the WPSD website. Download the AnyTone Contact TG Format file; it is updated daily.
After downloading the file:
Select Tool -> Import.
Click the Talk Groups button.
Navigate to and select the downloaded
BM-TGs_Anytone-Format.csvfile.
Once the import is complete, select the Contact/Talk Groups section and view the list.
Create Channels
A channel is where we finally start getting into more familiar territory. In the Common Settings section, open Channel. Here, you can see some default channels or none at all. Before hurrying to program anything else, bear with me and slow down. Delete your channels by right-clicking and selecting “Delete” on the lines that are there.
Double-click in the “No.” column on 1. You have two ways to set this up depending on whether you have a simplex or duplex hotspot.
Simplex Hotspots
Channel Name: Give it any name you like. In this example, we will use “WPSD Simplex.”
Receive/Transmit Frequency: Use whatever frequency you applied to your hotspot.
Channel Type: Set this to Digital.
Transmit Power: Generally, this is set to “Low,” especially if you are in the same room as your hotspot.
DMR Mode: Leave this on DMO/Simplex.
Digital Settings:
Contact: Click the button to display the talk groups you imported earlier. Scroll to the bottom, then up a few lines, and you will see “TG9 Local.” Double-click on that, and the button will change to “TG9 Local.”
Radio ID: Select the Radio ID Name you set up previously.
Color Code: Leave this on 1.
Slot: Set this to Slot2.
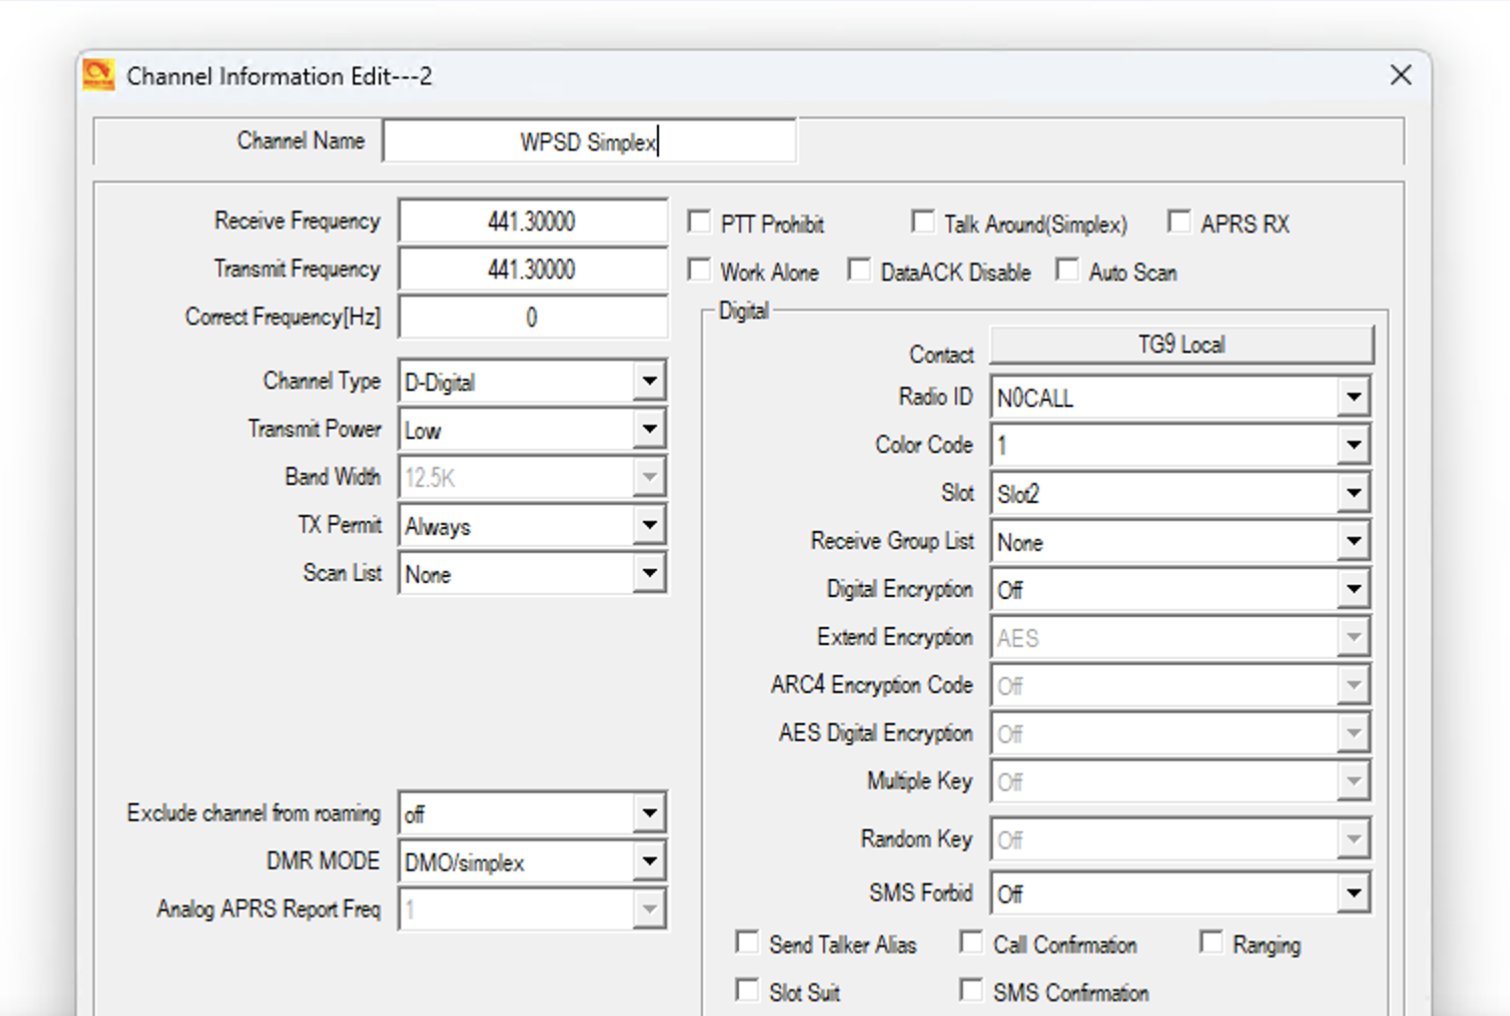
Leave the rest on defaults and click Ok.
Duplex Hotspots
Channel Name: Give it any name you like. In this example, we will use “WPSD Duplex.”
Receive Frequency: Use whatever frequency your hotspot is set to use on transmit*.
Transmit Frequency: Use whatever frequency your hotspot is set to use on receive*.
* Make sure these frequencies are the opposite of how you set your hotspot.
Channel Type: Set this to Digital.
t Transmit Power: Generally, this is set to “Low,” especially if you are in the same room as your hotspot.
DMR Mode: Change this to “Repeater.”
Digital Settings:
Contact: Click the button, and the talk groups you imported earlier will be displayed somewhat haphazardly. Scroll to the bottom, then up a few lines, and you will see “TG9 Local.” Double-click on that, and the button will change to “TG9 Local.”
Radio ID: Select the Radio ID Name you set up previously.
Color Code: Leave this on 1.
Slot: Set this to Slot1.

Create Zones
Again in Common Settings select Zone.
Double-click in the “No.” column on 1.
There should only be one channel on the left side. Highlight and move it to the right with the “>>” button.
Click “Ok” to finish.
Save Your Code Plug
File -> Save and navigate somewhere you can remember. Save your new CPS as something descriptive like D878UVII_Hotspot.
Load Your Code Plug
Now, load up your new code plug: Program -> Write to Radio. Once you have finished, and assuming you have followed the instructions in other sections correctly, you should be able to connect to your hotspot.
Disconnect your radio from USB, and if you followed the instructions to start with no other entries, you should be able to connect to your hotspot on TG9 Local. If you’d like to test without bothering anyone else, select Menu, Talk Group, Manual Dial, and enter 310997. This talk group is a special one called a Parrot. If you key up and speak, you should hear your voice back after a moment when you release the PTT.
You may use this method to connect to any other talk group by direct dial or use the List button to scroll through all the talk groups and find an interesting one.
Other Networks
Want to get into networks like FreeDMR, TGIF, and others? Build on what you’ve learned here and see where it takes you.
Special Thanks, by AA0NT
I do want to give thanks to Mike W2FBI for his help translating the past part of the Monolith that I was staring at like a monkey. It was ONE step, but I have to admit that, sadly, it took me several days to get past it the first time. DMR radios are very much a “once you know, you know” thing, but it looks pretty convoluted to most newcomers.